Hexo + NexT 配置优化指南

超长文警告!

记录 Hexo + NexT 的配置优化过程,以便后续更改和维护。

写在前面:

  • Hexo version:5.4.0NexT version:8.11.0,查看命令为hexo -v
  • 站点配置文件都是指博客根目录下的 _config.yml 文件,路径为 root/_config.yml。
  • 主题配置文件都是指主题文件里的 _config.yml 文件,路径为 root/theme/next/_config.yml。
  • 修改配置文件时“:”后面一定要有空格。
  • 配置完成可通过hexo clean hexo g hexo s预览。

全局配置

设置菜单

主题配置文件里查找 menu ,将注释取消。

1
2
3
4
5
6
7
8
9
10
11
12
menu:
home: / || fa fa-home #首页
about: /about/ || fa fa-user #关于
#tags: /tags/ || fa fa-tags #标签
categories: /categories/ || fa fa-th #分类
archives: /archives/ || fa fa-archive #归档
album: /album/ || fa fa-camera-retro #相册
gallery: /gallery/ || fa fa-paint-brush #画廊
tools: /tools/ || fa fa-square #工具
#schedule: /schedule/ || fa fa-calendar #日历
#sitemap: /sitemap.xml || fa fa-sitemap #站点地图
#commonweal: /404/ || fa fa-heartbeat #腾讯公益404

“||”前面是对应路径,后面是图标名称。NexT 使用的图标库为 Font Awesome,可自行添加或更换心仪的图标。

若想添加新的菜单,则仿照其添加对应的元素、路径和图标,同时在 theme/next/languages/zh-CN.yml 里的 menu 下添加相对应的中文。
1
2
3
4
5
6
7
8
9
10
11
12
13
menu:
home: 首页
archives: 归档
categories: 分类
tags: 标签
about: 关于
search: 搜索
schedule: 日程表
sitemap: 站点地图
commonweal: 公益 404
gallery: 画廊
album: 相册
tools: 工具
然后在博客根目录下打开 Git Bash,输入相应代码:hexo new page "菜单名称"
此时在博客根目录的 sources 文件夹下会生成对应的文件夹,每个文件夹中都有一个 index.md 文件,对文件内容进行修改,categories 的 index.md 修改如下,其他类推:
1
2
3
4
5
6
---
title: 分类
date: 2021-08-11 16:47:10
type: categories
comments: false
---
如有添加评论,则页面默认开启评论,要关闭评论将 comment 的值置为 false 即可。

更换网站图标

图标素材:icons
下载 16x16 和 32x32 的图标后,打开主题配置文件,修改 favicon 的 small 和 medium 的路径:

1
2
3
4
5
6
favicon:
small: /images/favicon-16x16-iceberg.png
medium: /images/favicon-32x32-iceberg.png
apple_touch_icon: /images/apple-touch-icon-next.png
safari_pinned_tab: /images/logo.svg
#android_manifest: /manifest.json

网站背景

动态背景

Canvas nest

1.在 root/themes/next 目录下打开 Git Bash ,输入命令:

1
git clone https://github.com/theme-next/theme-next-canvas-nest source/lib/canvas-nest
2.打开主题配置文件,添加如下代码:
1
2
3
4
5
6
7
8
9
10
# Canvas nest
# Dependencies: https://github.com/theme-next/theme-next-canvas nest
# For more information: https://github.com/hustcc/canvas-nest.js
canvas_nest:
enable: true
onmobile: true # Display on mobile or not
color: "0,0,255" # RGB values, use `,` to separate
opacity: 0.5 # The opacity of line: 0~1
zIndex: -1 # z-index property of the background
count: 99 # The number of lines

Canvas ribbon

打开主题配置文件,将 canvas_ribbon 的 enable 置为 true:

1
2
3
4
5
6
7
# Canvas ribbon
# For more information: https://github.com/hustcc/ribbon.js
canvas_ribbon:
enable: true
size: 300 # The width of the ribbon
alpha: 0.6 # The transparency of the ribbon
zIndex: -1 # The display level of the ribbon

雪花飘飘

1.在 root/themes/next/source/js/src 目录下新建 snow.js 文件,添加以下代码。

1
2
3
4
5
6
7
8
9
10
11
12
13
14
15
16
17
18
19
20
21
22
23
24
25
26
27
28
29
30
31
32
33
34
35
36
37
38
39
40
41
42
/*样式一*/
(function($){
$.fn.snow = function(options){
var $flake = $('<div id="snowbox" />').css({'position': 'absolute','z-index':'9999', 'top': '-50px'}).html('&#10052;'),
documentHeight = $(document).height(),
documentWidth = $(document).width(),
defaults = {
minSize : 10,
maxSize : 20,
newOn : 1000,
flakeColor : "#AFDAEF" /* 此处可以定义雪花颜色,若要白色可以改为#FFFFFF */
},
options = $.extend({}, defaults, options);
var interval= setInterval( function(){
var startPositionLeft = Math.random() * documentWidth - 100,
startOpacity = 0.5 + Math.random(),
sizeFlake = options.minSize + Math.random() * options.maxSize,
endPositionTop = documentHeight - 200,
endPositionLeft = startPositionLeft - 500 + Math.random() * 500,
durationFall = documentHeight * 10 + Math.random() * 5000;
$flake.clone().appendTo('body').css({
left: startPositionLeft,
opacity: startOpacity,
'font-size': sizeFlake,
color: options.flakeColor
}).animate({
top: endPositionTop,
left: endPositionLeft,
opacity: 0.2
},durationFall,'linear',function(){
$(this).remove()
});
}, options.newOn);
};
})(jQuery);
$(function(){
$.fn.snow({
minSize: 5, /* 定义雪花最小尺寸 */
maxSize: 50,/* 定义雪花最大尺寸 */
newOn: 300 /* 定义密集程度,数字越小越密集 */
});
});
2.接下来在 root/themes/next/layout/_layout.njk 引入 jQuery,如果之前已经引入了 jQuery,则忽略这一步:
1
2
<!-- 引入jQuery -->
<script type="text/javascript" src="//libs.baidu.com/jquery/1.8.3/jquery.min.js"></script>
3.再在后面添加如下代码:
1
2
3
4
<!-- 雪花特效 -->
{% if theme.snow.enable %}
<script type="text/javascript" src="/js/src/snow.js"></script>
{% endif %}
4.最后在主题配置文件加入配置代码:
1
2
3
# 雪花特效
snow:
enable: true

背景图片

1.将背景图片放到 root/themes/next/source/images 下。
2.打开主题配置文件,将 style: source/_data/styles.styl 取消注释:

1
2
custom_file_path:
style: source/_data/styles.styl
3.在 root/source 下创建文件 _data/styles.styl,添加以下内容:
1
2
3
4
5
6
7
8
9
// 添加背景图片
// 添加背景图片
body {
background: url(/images/background.jpg); // 可以是路径也可以是链接
background-size: cover // 设置保持图像的纵横比并将图像缩放成将完全覆盖背景定位区域的最小大小
background-repeat: no-repeat; // 设定背景图片非重复填充
background-attachment: fixed; // 设置背景图片不随页面滚动
background-position: 50% 50%; // 图片位置:居中
}

添加 Fork me on Github

打开 Github Corners ,选择喜欢的样式,复制相应代码到 root/themes/next/layout/_layout.njk 文件中,放在<div class="headband"></div>后面,并修改href="https://your-url"里的网址为自己 GitHub 主页的网址。
如图:

更改博客主标题背景颜色(Gemini主题)

博客主标题背景默认为黑色,相关代码在 root/themes/next/source/css/_schemes/Pisces/_header.styl 里:

1
2
.site-brand-container {
//background: var(--theme-color);
可以更改为主题提供的基础颜色,见 root/themes/next/source/css/_variables/base.styl :
1
2
3
4
5
6
7
8
9
10
11
12
13
14
15
16
17
// Color system
// --------------------------------------------------
$whitesmoke = #f5f5f5;
$gainsboro = #eee;
$grey-lighter = #ddd;
$grey-light = #ccc;
$grey = #bbb;
$grey-dark = #999;
$grey-dim = #666;
$black-light = #555;
$black-dim = #333;
$black-deep = #222;
$red = #ff2a2a;
$blue-bright = #87daff;
$blue = #0684bd;
$blue-deep = #262a30;
$orange = #fc6423;
也可以直接更改为自己想要的颜色的十六进制代码,1如:

1
2
3
.site-brand-container {
//background: var(--theme-color);
background: #475164;

还可以改为渐变色,如:

1
2
3
.site-brand-container {
//background: var(--theme-color);
background: linear-gradient(200deg, #2e80a5, #0c0c0b);

调整页面宽度(Gemini)

修改文件 root/themes/next/source/css/_variables/Pisces.styl,调整如下:

1
2
3
4
5
6
7
$content-desktop              = 'calc(100% - %s)' % unit($content-desktop-padding / 2, 'px');
// $content-desktop-large = 1160px;
// $content-desktop-largest = 73%;

$content-desktop-large = 85em
$content-desktop-largest = 85%

安装RSS插件

1.在根目录打开 Git Bash 执行指令安装插件:2

npm install hexo-generator-feed --save
2.在站点配置文件末尾加上如下代码:

1
2
3
4
5
6
7
8
9
10
11
12
feed:
type: atom
path: atom.xml
limit: 20
hub:
content:
content_limit: 140
content_limit_delim: ' '
order_by: -date
icon: icon.png
autodiscovery: true
template:

添加进度显示和回到顶部按钮

NexT主题自带

主题配置文件里找到 back2top 项进行修改

1
2
3
4
5
6
back2top:
enable: true #页面右下角显示回到顶部按钮
# Back to top in sidebar.
sidebar: false #为true时按钮位置变为侧边栏底部
# Scroll percent label in b2t button.
scrollpercent: true #显示浏览进度百分比

moon-cake样式

1.输入如下命令下载插件:
npm install hexo-cake-moon-menu
2.在主题配置文件里添加下面代码:

1
2
3
4
5
6
7
8
9
moon_menu:
back2top:
enable: true
icon: fas fa-chevron-up
order: -1
back2bottom:
enable: true
icon: fas fa-chevron-down
order: -2

添加可切换的夜间模式

1.参考 Hexo Next 8.x 主题添加可切换的暗黑模式
2.输入命令npm install hexo-next-darkmode --save安装插件,注意安装前先关闭自带的黑暗模式。
2.安装完成后在主题配置文件里添加以下代码:

1
2
3
4
5
6
7
8
9
10
11
12
13
14
15
16
17
# Darkmode JS
# For more information: https://github.com/rqh656418510/hexo-next-darkmode, https://github.com/sandoche/Darkmode.js
darkmode_js:
enable: true
bottom: '64px' # default: '32px'
right: 'unset' # default: '32px'
left: '32px' # default: 'unset'
time: '0.5s' # default: '0.3s'
mixColor: 'transparent' # default: '#fff'
backgroundColor: 'transparent' # default: '#fff'
buttonColorDark: '#100f2c' # default: '#100f2c'
buttonColorLight: '#fff' # default: '#fff'
isActivated: true # default false
saveInCookies: true # default: true
label: '🌓' # default: ''
autoMatchOsTheme: true # default: true
libUrl: # Set custom library cdn url for Darkmode.js

开启本地搜索

1.执行命令npm install hexo-generator-search --save安装插件。
2.安装完成后在站点配置文件内添加以下内容:

1
2
3
4
5
6
#本地搜索
search:
path: search.xml
field: post
format: html
limit: 10000
3.修改主题配置文件里 local_search 的 enable 值为 true ,启用本地搜索。
1
2
3
4
5
6
7
8
9
10
11
local_search:
enable: true
# If auto, trigger search by changing input.
# If manual, trigger search by pressing enter key or search button.
trigger: auto
# Show top n results per article, show all results by setting to -1
top_n_per_article: 1
# Unescape html strings to the readable one.
unescape: false
# Preload the search data when the page loads.
preload: false

点击放大图片

主题配置文件内 fancybox 的值置为 true 即可。

添加评论系统 waline

1.按照 waline 快速上手进行配置,注意 LeanCloud 注册时左上角选择国际版,后续添加环境变量时不用绑定域名,比较方便。
2.执行命令npm install @waline/hexo-next安装官方插件。
3.然后在主题配置文件添加如下内容:

1
2
3
4
5
6
7
8
9
10
11
12
13
14
# Waline
# For more information: https://waline.js.org, https://github.com/walinejs/waline
waline:
enable: true #是否开启
serverURL: # Waline #服务端地址,就是上面部署的 Vercel 地址
placeholder: 请文明评论呀 #评论框的默认文字
avatar: mm # 头像风格
meta: [nick, mail, link] # 自定义评论框上面的三个输入框的内容
pageSize: 10 # 评论数量多少时显示分页
lang: zh-cn # 语言, 可选值: en, zh-cn
visitor: false # 文章阅读统计
comment_count: true # 如果为 false , 评论数量只会在当前评论页面显示, 主页则不显示
requiredFields: [] # 设置用户评论时必填的信息,[nick,mail]: [nick] | [nick, mail]
libUrl: # Set custom library cdn url

边框圆角

1.在主题配置文件里将 variable 的注释取消:

1
2
custom_file_path:
variable: source/_data/variables.styl
2.在 root/source/_data 下新建 variables.styl ,添加如下内容:
1
2
3
// 圆角设置
$border-radius-inner = 20px 20px 20px 20px;
$border-radius = 20px;

繁简体切换3

1.下载简繁字体切换所需的 tw_cn.js 文件放到 root/themes/source/js/src/ 下。
2.在想要显示简繁转换按钮的地方添加如下代码:

1
2
3
4
5
6
7
8
9
10
11
12
13
14
<div class="translate-style">
繁/简:<a id="translateLink" href="javascript:translatePage();">繁体
</a>
</div>
<script type="text/javascript" src="/js/src/tw_cn.js"></script>
<script type="text/javascript">
var defaultEncoding = 2; //网站编写字体是否繁体,1-繁体,2-简体
var translateDelay = 0; //延迟时间,若不在前, 要设定延迟翻译时间, 如100表示100ms,默认为0
var cookieDomain = "https://tding.top/"; //Cookie地址, 一定要设定, 通常为你的网址
var msgToTraditionalChinese = "繁体"; //此处可以更改为你想要显示的文字
var msgToSimplifiedChinese = "简体"; //同上,但两处均不建议更改
var translateButtonId = "translateLink"; //默认互换id
translateInitilization();
</script>

更换字体

host 使用烧饼博客提供的镜像。
在主题配置文件对 font 进行如下修改:

1
2
3
4
5
6
7
8
9
10
11
12
13
14
15
16
17
18
19
20
21
22
23
24
25
26
27
28
29
30
31
32
33
34
35
36
37
38
39
40
41
42
43
44
45
46
font:
enable: true

# Uri of fonts host, e.g. https://fonts.googleapis.com (Default).
# 使用烧饼博客的CDN
host: https://fonts.loli.net

# Font options:
# `external: true` will load this font family from `host` above.
# `family: Times New Roman`. Without any quotes.
# `size: x.x`. Use `em` as unit. Default: 1 (16px)

# Global font settings used for all elements inside <body>.
# 全局字体设置
global:
external: true
#family: EB Garamond
family: Noto Serif SC
size: 0.9

# Font settings for site title (.site-title).
# .site-title 站点标题字体设置
title:
external: true
family: EB Garamond
size:

# Font settings for headlines (<h1> to <h6>).
# 文章标题字体设置
headings:
external: true
#family: Roboto Slab
family: EB Garamond
size:

# Font settings for posts (.post-body).
# 文章页面字体设置
posts:
external: true
#family: Roboto Slab

# Font settings for <code> and code blocks.
# 代码块字体设置
codes:
external: true
family: Source Code Pro

首页顶部留白

在 root/source/_data/styles.styl 里添加如下内容:

1
2
//首页顶部留白
.main{margin-top:10px;}

鼠标样式

1.在 root/source/_data/styles.styl 里添加样式:

1
2
3
4
5
6
7
// 鼠标样式
* {
cursor: url(/images/default.cur),auto!important
}
:link {
cursor: url(/images/pointer.cur),auto!important
}
2.将下面两个文件放在 root/themes/next/source/images/ 下。
default.cur pointer.cur

鼠标点击烟花效果

1.下载 JavaScript 脚本,放在 root/themes/next/source/js/cursor/ 下。
2.在 root/themes/next/layout/_custom/custom.njk 中添加如下内容:

1
2
3
4
5
6
7
8
9
10
11
12
{# 鼠标点击烟花特效 #}
{% if theme.cursor_effect == "fireworks" %}
<script async src="/js/cursor/fireworks.js"></script>
{% elseif theme.cursor_effect == "explosion" %}
<canvas class="fireworks" style="position: fixed;left: 0;top: 0;z-index: 1; pointer-events: none;" ></canvas>
<script src="//cdn.bootcss.com/animejs/2.2.0/anime.min.js"></script>
<script async src="/js/cursor/explosion.min.js"></script>
{% elseif theme.cursor_effect == "love" %}
<script async src="/js/cursor/love.min.js"></script>
{% elseif theme.cursor_effect == "text" %}
<script async src="/js/cursor/text.js"></script>
{% endif %}
3.在 root/themes/next/layout/_layout.njk 中添加{% include '_custom/custom.swig' %}。位置如下:
4.在主题配置文件加入以下内容:
1
2
# 鼠标点击烟花特效
cursor_effect: fireworks

渲染 mathjax

1.卸载 hexo-math,使用 hexo-renderer-mathjax:

1
2
npm uninstall hexo-math --save
npm install hexo-renderer-mathjax --save
2.卸载原来的渲染器 hexo-renderer-marked,使用 hexo-renderer-pandoc 作为 Hexo 的 Markdown 渲染器:
1
2
npm un hexo-renderer-marked
npm i hexo-renderer-pandoc
3.在Pandoc 官网下载 Pandoc,安装后重启电脑。

文件跳过渲染

修改站点配置文件中的 skip_render 配置项。

只有 source 目录下的文件才会发布,因此 Hexo 只渲染 source 目录下的文件。skip_render 参数设置的路径是相对于 source 目录的路径。

1
2
3
4
5
6
7
8
9
10
11
12
13
14
#单个文件
skip_render: hello.html

#单个文件夹下全部文件
skip_render: test/*

#单个文件夹下指定类型文件
skip_render: test/*.md

#单个文件夹下全部文件以及子目录
skip_render: test/**

#跳过多个目录,或者多个文件
skip_render: ['*.html', demo/**, test/*]

配置主题加载动画

主题配置文件中找到 motion 项进行配置。
Next 主题支持的动画可在这里查看。

1
2
3
4
5
6
7
8
9
10
11
motion:
enable: true
async: true
transition:
# All available transition variants: https://theme-next.js.org/animate/
post_block: fadeIn # 文章板块动画
post_header: fadeInDown # 文章标题动画
post_body: fadeInDown # 文章内容动画
coll_header: fadeInLeft
# Only for Pisces | Gemini.
sidebar: fadeInUp # 侧边栏动画
配置 post-header 和 post-body 的 visibility 属性为 inherit,使其继承父元素的 visibility 属性的值,可让文章标题和内容与其他元素同步加载。
1
2
3
.use-motion .post-header, .use-motion .post-body{
visibility: inherit
}

侧边栏配置

侧边栏头像

将头像(jpg、gif)放到 root/themes/next/source/images 下,打开主题配置文件,修改 avatar 的 url:

1
2
3
4
5
6
7
8
# Sidebar Avatar
avatar:
# Replace the default image and set the url here.
url: /images/avatar.gif #图片的位置,也可以是链接:http://xxx.com/avatar.png
# If true, the avatar will be displayed in circle.
rounded: true #头像展示在圆框里
# If true, the avatar will be rotated with the cursor.
rotated: false #头像随光标旋转

添加 social 链接

打开主题配置文件,在 social 下添加链接:

1
2
3
4
social:
GitHub: https://github.com/reman2021 || fab fa-github
CSDN: https://blog.csdn.net/m0_55420671?spm=1010.2135.3001.5343 || fab fa-codiepie
RSS: /atom.xml || fa fa-rss

更改侧边栏和菜单栏透明度

在更改菜单栏透明度后,本地搜索出现了问题,暂未解决

在 root/source/_data/styles.styl 里添加如下内容:

1
2
3
4
5
6
7
8
9
//侧边框的透明度设置
.sidebar {
opacity: 0.9;
}

//菜单栏的透明度设置
.header-inner {
opacity: 0.9;
}

侧边栏添加 canvas 粒子时钟

1.在 root/themes/next/layout/_custom/ 目录下新建 clock.njk 文件,添加如下内容:

1
2
3
4
5
6
7
8
9
10
11
12
13
14
15
16
17
18
19
20
21
22
23
24
25
26
27
28
29
30
31
32
33
34
35
36
37
38
39
40
41
42
43
44
45
46
47
48
49
50
51
52
53
54
55
56
57
58
59
60
61
62
63
64
65
66
67
68
69
70
71
72
73
74
75
76
77
78
79
80
81
82
83
84
85
86
87
88
89
90
91
92
93
94
95
96
97
98
99
100
101
102
103
104
105
106
107
108
109
110
111
112
113
114
115
116
117
118
119
120
121
122
123
124
125
126
127
128
129
130
131
132
133
134
135
136
137
138
139
140
141
142
143
144
145
146
147
148
149
150
151
152
153
154
155
156
157
158
159
160
161
162
163
164
165
166
167
168
169
170
171
172
173
174
175
176
177
178
179
180
181
182
183
184
185
186
187
188
189
190
191
192
193
194
195
196
197
198
199
200
201
202
203
204
205
206
207
208
209
210
211
212
213
214
215
216
217
218
219
220
221
222
223
224
225
226
227
228
229
230
231
232
233
234
235
236
237
238
239
240
241
242
243
244
245
246
247
248
249
250
251
252
253
254
255
256
257
258
259
260
261
262
263
264
265
<div style="">
<canvas id="canvas" style="width:60%;">当前浏览器不支持canvas,请更换浏览器后再试</canvas>
</div>
<script>
(function(){

var digit=
[
[
[0,0,1,1,1,0,0],
[0,1,1,0,1,1,0],
[1,1,0,0,0,1,1],
[1,1,0,0,0,1,1],
[1,1,0,0,0,1,1],
[1,1,0,0,0,1,1],
[1,1,0,0,0,1,1],
[1,1,0,0,0,1,1],
[0,1,1,0,1,1,0],
[0,0,1,1,1,0,0]
],//0
[
[0,0,0,1,1,0,0],
[0,1,1,1,1,0,0],
[0,0,0,1,1,0,0],
[0,0,0,1,1,0,0],
[0,0,0,1,1,0,0],
[0,0,0,1,1,0,0],
[0,0,0,1,1,0,0],
[0,0,0,1,1,0,0],
[0,0,0,1,1,0,0],
[1,1,1,1,1,1,1]
],//1
[
[0,1,1,1,1,1,0],
[1,1,0,0,0,1,1],
[0,0,0,0,0,1,1],
[0,0,0,0,1,1,0],
[0,0,0,1,1,0,0],
[0,0,1,1,0,0,0],
[0,1,1,0,0,0,0],
[1,1,0,0,0,0,0],
[1,1,0,0,0,1,1],
[1,1,1,1,1,1,1]
],//2
[
[1,1,1,1,1,1,1],
[0,0,0,0,0,1,1],
[0,0,0,0,1,1,0],
[0,0,0,1,1,0,0],
[0,0,1,1,1,0,0],
[0,0,0,0,1,1,0],
[0,0,0,0,0,1,1],
[0,0,0,0,0,1,1],
[1,1,0,0,0,1,1],
[0,1,1,1,1,1,0]
],//3
[
[0,0,0,0,1,1,0],
[0,0,0,1,1,1,0],
[0,0,1,1,1,1,0],
[0,1,1,0,1,1,0],
[1,1,0,0,1,1,0],
[1,1,1,1,1,1,1],
[0,0,0,0,1,1,0],
[0,0,0,0,1,1,0],
[0,0,0,0,1,1,0],
[0,0,0,1,1,1,1]
],//4
[
[1,1,1,1,1,1,1],
[1,1,0,0,0,0,0],
[1,1,0,0,0,0,0],
[1,1,1,1,1,1,0],
[0,0,0,0,0,1,1],
[0,0,0,0,0,1,1],
[0,0,0,0,0,1,1],
[0,0,0,0,0,1,1],
[1,1,0,0,0,1,1],
[0,1,1,1,1,1,0]
],//5
[
[0,0,0,0,1,1,0],
[0,0,1,1,0,0,0],
[0,1,1,0,0,0,0],
[1,1,0,0,0,0,0],
[1,1,0,1,1,1,0],
[1,1,0,0,0,1,1],
[1,1,0,0,0,1,1],
[1,1,0,0,0,1,1],
[1,1,0,0,0,1,1],
[0,1,1,1,1,1,0]
],//6
[
[1,1,1,1,1,1,1],
[1,1,0,0,0,1,1],
[0,0,0,0,1,1,0],
[0,0,0,0,1,1,0],
[0,0,0,1,1,0,0],
[0,0,0,1,1,0,0],
[0,0,1,1,0,0,0],
[0,0,1,1,0,0,0],
[0,0,1,1,0,0,0],
[0,0,1,1,0,0,0]
],//7
[
[0,1,1,1,1,1,0],
[1,1,0,0,0,1,1],
[1,1,0,0,0,1,1],
[1,1,0,0,0,1,1],
[0,1,1,1,1,1,0],
[1,1,0,0,0,1,1],
[1,1,0,0,0,1,1],
[1,1,0,0,0,1,1],
[1,1,0,0,0,1,1],
[0,1,1,1,1,1,0]
],//8
[
[0,1,1,1,1,1,0],
[1,1,0,0,0,1,1],
[1,1,0,0,0,1,1],
[1,1,0,0,0,1,1],
[0,1,1,1,0,1,1],
[0,0,0,0,0,1,1],
[0,0,0,0,0,1,1],
[0,0,0,0,1,1,0],
[0,0,0,1,1,0,0],
[0,1,1,0,0,0,0]
],//9
[
[0,0,0,0,0,0,0],
[0,0,1,1,1,0,0],
[0,0,1,1,1,0,0],
[0,0,1,1,1,0,0],
[0,0,0,0,0,0,0],
[0,0,0,0,0,0,0],
[0,0,1,1,1,0,0],
[0,0,1,1,1,0,0],
[0,0,1,1,1,0,0],
[0,0,0,0,0,0,0]
]//:
];

var canvas = document.getElementById('canvas');

if(canvas.getContext){
var cxt = canvas.getContext('2d');
//声明canvas的宽高
var H = 100,W = 700;
canvas.height = H;
canvas.width = W;
cxt.fillStyle = '#f00';
cxt.fillRect(10,10,50,50);

//存储时间数据
var data = [];
//存储运动的小球
var balls = [];
//设置粒子半径
var R = canvas.height/20-1;
(function(){
var temp = /(\d)(\d):(\d)(\d):(\d)(\d)/.exec(new Date());
//存储时间数字,由十位小时、个位小时、冒号、十位分钟、个位分钟、冒号、十位秒钟、个位秒钟这7个数字组成
data.push(temp[1],temp[2],10,temp[3],temp[4],10,temp[5],temp[6]);
})();

/*生成点阵数字*/
function renderDigit(index,num){
for(var i = 0; i < digit[num].length; i++){
for(var j = 0; j < digit[num][i].length; j++){
if(digit[num][i][j] == 1){
cxt.beginPath();
cxt.arc(14*(R+2)*index + j*2*(R+1)+(R+1),i*2*(R+1)+(R+1),R,0,2*Math.PI);
cxt.closePath();
cxt.fill();
}
}
}
}

/*更新时钟*/
function updateDigitTime(){
var changeNumArray = [];
var temp = /(\d)(\d):(\d)(\d):(\d)(\d)/.exec(new Date());
var NewData = [];
NewData.push(temp[1],temp[2],10,temp[3],temp[4],10,temp[5],temp[6]);
for(var i = data.length-1; i >=0 ; i--){
//时间发生变化
if(NewData[i] !== data[i]){
//将变化的数字值和在data数组中的索引存储在changeNumArray数组中
changeNumArray.push(i+'_'+(Number(data[i])+1)%10);
}
}
//增加小球
for(var i = 0; i< changeNumArray.length; i++){
addBalls.apply(this,changeNumArray[i].split('_'));
}
data = NewData.concat();
}

/*更新小球状态*/
function updateBalls(){
for(var i = 0; i < balls.length; i++){
balls[i].stepY += balls[i].disY;
balls[i].x += balls[i].stepX;
balls[i].y += balls[i].stepY;
if(balls[i].x > W + R || balls[i].y > H + R){
balls.splice(i,1);
i--;
}
}
}

/*增加要运动的小球*/
function addBalls(index,num){
var numArray = [1,2,3];
var colorArray = ["#3BE","#09C","#A6C","#93C","#9C0","#690","#FB3","#F80","#F44","#C00"];
for(var i = 0; i < digit[num].length; i++){
for(var j = 0; j < digit[num][i].length; j++){
if(digit[num][i][j] == 1){
var ball = {
x:14*(R+2)*index + j*2*(R+1)+(R+1),
y:i*2*(R+1)+(R+1),
stepX:Math.floor(Math.random() * 4 -2),
stepY:-2*numArray[Math.floor(Math.random()*numArray.length)],
color:colorArray[Math.floor(Math.random()*colorArray.length)],
disY:1
};
balls.push(ball);
}
}
}
}

/*渲染*/
function render(){
//重置画布宽度,达到清空画布的效果
canvas.height = 100;
//渲染时钟
for(var i = 0; i < data.length; i++){
renderDigit(i,data[i]);
}
//渲染小球
for(var i = 0; i < balls.length; i++){
cxt.beginPath();
cxt.arc(balls[i].x,balls[i].y,R,0,2*Math.PI);
cxt.fillStyle = balls[i].color;
cxt.closePath();
cxt.fill();
}
}

clearInterval(oTimer);
var oTimer = setInterval(function(){
//更新时钟
updateDigitTime();
//更新小球状态
updateBalls();
//渲染
render();
},50);
}

})();
</script>

2.在 root_macro.njk 中引入如下代码4

1
2
3
4
{% if theme.diy_time.clock %}
<!-- canvas粒子时钟 -->
{% include '../_custom/clock.swig' %}
{% endif %}

3.在主题配置文件中加入应用代码:

1
2
3
4
5
# 侧栏粒子时钟
diy_time:
runtime: true
clock: true # 粒子时钟

侧边栏添加日历云

1.安装 theme-next-calendar 插件

1
npm install --save git://github.com/icecory/theme-next-calendar#hexo
2.在theme-next-calendar下载相关文件后解压放到 root/themes/next/source/lib/ 目录下,文件夹命名为 calendar。
3.将 calendar.styl 中的代码直接复制到 root/source/_data/styles.styl 中。

为适应夜间模式,可将日历云背景色改为背板颜色

1
2
3
/*全句背景色*/
//background-color #EEEEEE
background-color var(--content-bg-color);

4.在 root/themes/next/layout 下新建 calendar.njk 文件,将下载的 calendar.swig 文件里的代码复制到里面。
5.然后在 themes/next/layout/_layout.njk 里加入下面代码:
1
{% include 'calendar.njk' %}
6.在主题配置文件最后加入下面代码,并找到 custom_file_path 取消 sidebar 的注释:
1
2
3
4
5
6
7
8
custom_file_path:
sidebar: source/_data/sidebar.njk

CloudCalendar:
enable: true
language: zh-CN #设置语言
single: true
root: /calendar/
7.在 root/source/_data/sidebar.njk 添加如下代码:

1
2
3
4
<!-- CloudCalendar -->
<div class="widget-wrap" style="width: 90%;margin-left: auto;margin-right: auto; opacity: 0.97;">
<div class="widget" id="CloudCalendar"></div>
</div>

与雪花背景一起添加在 _layout.njk 里时,应都放在<body></body>外,且雪花背景代码在前,不然会发生冲突导致日历云消失,原因不明。

添加标签云

1.执行命令npm install hexo-tag-cloud@^2.1.* --save安装标签云插件。
2.在 root/theme/next/layout/_macro/sidebar.njk 文件添加如下代码:

1
2
3
4
5
6
7
8
9
10
11
12
13
{% if site.tags.length > 1 %}
<script type="text/javascript" charset="utf-8" src="/js/tagcloud.js"></script>
<script type="text/javascript" charset="utf-8" src="/js/tagcanvas.js"></script>
<div class="widget-wrap">
<h3 class="widget-title">Tag Cloud</h3>
<div id="myCanvasContainer" class="widget tagcloud">
<canvas width="240" height="180" id="resCanvas" style="width=100%">
{{ list_tags() }}
</canvas>
</div>
</div>
{% endif %}

3.在站点配置文件添加相应的配置项
1
2
3
4
5
6
7
8
# hexo-tag-cloud
tag_cloud:
textFont: Trebuchet MS, Helvetica
textColor: '#621d34'
textHeight: 18
outlineColor: '#e9d7df'
maxSpeed: 0.05 # range from [0.01 ~ 1]
pauseOnSelected: false # true means pause the cloud tag movement when highlight a tag

页脚配置

设置建站时间和网站运行时间

设置建站时间

打开主题配置文件,在 since 后添加建站时间:

1
2
3
footer:
# Specify the year when the site was setup. If not defined, current year will be used.
since: 2021-08-11 #建站时间

页脚添加网站运行时间

将下面代码添加到 root/themes/next/layout/_partials/footer.njk 文件的合适位置,修改var t1 = Date.UTC(2021,08,11,00,00,00);为自己的建站时间。

1
2
3
4
5
6
7
8
9
10
11
12
13
14
15
16
17
18
19
20
21
22
23
24
25
26
27
28
29
30
31
32
33
34
35
36
37
38
<span id="sitetime"></span>
<script language=javascript>
function siteTime(){
window.setTimeout("siteTime()", 1000);
var seconds = 1000;
var minutes = seconds * 60;
var hours = minutes * 60;
var days = hours * 24;
var years = days * 365;
var today = new Date();
var todayYear = today.getFullYear();
var todayMonth = today.getMonth()+1;
var todayDate = today.getDate();
var todayHour = today.getHours();
var todayMinute = today.getMinutes();
var todaySecond = today.getSeconds();
/*
Date.UTC() -- 返回date对象距世界标准时间(UTC)1970年1月1日午夜之间的毫秒数(时间戳)
year - 作为date对象的年份,为4位年份值
month - 0-11之间的整数,做为date对象的月份
day - 1-31之间的整数,做为date对象的天数
hours - 0(午夜24点)-23之间的整数,做为date对象的小时数
minutes - 0-59之间的整数,做为date对象的分钟数
seconds - 0-59之间的整数,做为date对象的秒数
microseconds - 0-999之间的整数,做为date对象的毫秒数
*/
var t1 = Date.UTC(2021,08,11,00,00,00); //北京时间2021-8-11 00:00:00
var t2 = Date.UTC(todayYear,todayMonth,todayDate,todayHour,todayMinute,todaySecond);
var diff = t2-t1;
var diffYears = Math.floor(diff/years);
var diffDays = Math.floor((diff/days)-diffYears*365);
var diffHours = Math.floor((diff-(diffYears*365+diffDays)*days)/hours);
var diffMinutes = Math.floor((diff-(diffYears*365+diffDays)*days-diffHours*hours)/minutes);
var diffSeconds = Math.floor((diff-(diffYears*365+diffDays)*days-diffHours*hours-diffMinutes*minutes)/seconds);
document.getElementById("sitetime").innerHTML=" 本站已悄悄运行"+/*diffYears+" 年 "+*/diffDays+" 天 "+diffHours+" 小时 "+diffMinutes+" 分钟 "+diffSeconds+" 秒";
}
siteTime();
</script>

底部图标配置

主题配置文件里找到 footer 下的 icon 配置项进行修改

1
2
3
4
5
6
7
8
# Icon between year and copyright info.
icon:
# Icon name in Font Awesome. See: https://fontawesome.com/icons
name: fa fa-heart #图标名称,来源Font Awesome图标库
# If you want to animate the icon, set it to true.
animated: true #图标跳动
# Change the color of icon, using Hex Code.
color: "#ff0000" #图标颜色

文章配置

修改首页分页文章数

站点配置文件中找到 index_generator,修改 per_page 项:

1
2
3
4
index_generator:
path: ''
per_page: 5
order_by: -date

关闭首页“阅读更多”按钮

主题配置文件中找到 read_more_btn,修改其值为 false,即可关闭。

显示文章字数和阅读时长

1.根目录打开 Git Bash ,执行下面的命令,安装插件:

npm install hexo-wordcount --save
2.然后在站点配置文件末尾加上下面的代码:

1
2
3
4
5
6
symbols_count_time:
symbols: true # 文章字数统计
time: true # 文章阅读时长
total_symbols: true # 站点总字数统计
total_time: true # 站点总阅读时长
exclude_codeblock: false # 排除代码字数统计

自定义博文内链接颜色

在 root/themes/next/source/css/_common/components/post/post.styl 文件里添加如下代码:

1
2
3
4
5
6
7
8
.post-body p a{
color: #ba2f7b; //链接颜色
border-bottom: none;
&:hover {
color: #815c94; //光标悬停时链接颜色
text-decoration: underline;
}
}

文章末尾添加结束标记

1.在 root/themes/next/layout/_macro 中新建 passage-end-tag.njk 文件,并添加以下内容,分割线中间内容可自定义:

1
2
3
4
5
<div>
{% if not is_index %}
<div style="text-align:center;color: #ccc;font-size:24px;">-------------------------- <i class="fa fa-battery-full" aria-hidden="true"></i> --------------------------</div>
{% endif %}
</div>
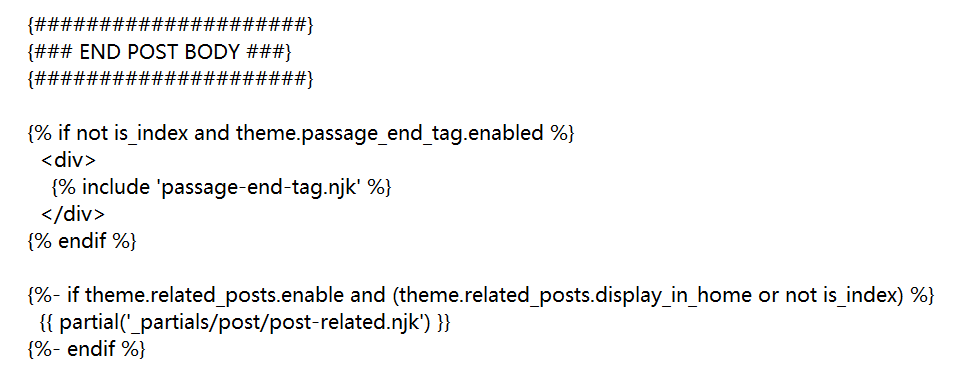
2.打开 root/themes/next/layout/_macro/post.njk 文件,在 END POST BODY 后添加代码:
1
2
3
4
5
{% if not is_index and theme.passage_end_tag.enabled %}
<div>
{% include 'passage-end-tag.swig' %}
</div>
{% endif %}
具体位置如图:

文章添加版权说明

主题配置文件中找到 creative_commons 进行修改:

1
2
3
4
5
creative_commons:
license: by-nc-sa
sidebar: true
post: true # 将false改为true即可显示版权信息
language:

文章版权样式自定义

1.在目录 root/themes/next/layout/_macro/ 下添加 my-copyright.njk,内容如下:

1
2
3
4
5
6
7
8
9
10
11
12
13
14
15
16
17
18
19
20
21
22
23
24
25
26
27
28
29
30
31
32
33
{% if page.copyright %}
<div class="my_post_copyright">
<script src="//cdn.bootcss.com/clipboard.js/1.5.10/clipboard.min.js"></script>

<!-- JS库 sweetalert 可修改路径 -->
<script type="text/javascript" src="http://jslibs.wuxubj.cn/sweetalert_mini/jquery-1.7.1.min.js"></script>
<script src="http://jslibs.wuxubj.cn/sweetalert_mini/sweetalert.min.js"></script>
<link rel="stylesheet" type="text/css" href="http://jslibs.wuxubj.cn/sweetalert_mini/sweetalert.mini.css">

<p><span>本文标题:</span>{{ page.title }}</a></p>
<p><span>文章作者:</span>{{ author }}</a></p>
<p><span>发布时间:</span>{{ page.date.format("YYYY年MM月DD日 - HH:mm:ss") }}</p>
<p><span>最后更新:</span>{{ page.updated.format("YYYY年MM月DD日 - HH:mm:ss") }}</p>
<p><span>原始链接:</span><a href="{{ url_for(page.path) }}" title="{{ page.title }}">{{ page.permalink }}</a>
<span class="copy-path" title="点击复制文章链接"><i class="fa fa-clipboard" data-clipboard-text="{{ page.permalink }}" aria-label="复制成功!"></i></span>
</p>
<p><span>许可协议:</span><i class="fa fa-creative-commons"></i> <a rel="license" href="https://creativecommons.org/licenses/by-nc-nd/4.0/" target="_blank" title="Attribution-NonCommercial-NoDerivatives 4.0 International (CC BY-NC-ND 4.0)">署名-非商业性使用-禁止演绎 4.0 国际</a> 转载请保留原文链接及作者。</p>
</div>
<script>
var clipboard = new Clipboard('.fa-clipboard');
clipboard.on('success', $(function(){
$(".fa-clipboard").click(function(){
swal({
title: "",
text: '复制成功',
html: false,
timer: 500,
showConfirmButton: false
});
});
}));
</script>
{% endif %}
2.在目录 root/themes/next/source/css/_common/components/post/ 下添加 my-post-copyright.styl,内容如下:
1
2
3
4
5
6
7
8
9
10
11
12
13
14
15
16
17
18
19
20
21
22
23
24
25
26
27
28
29
30
31
32
33
34
35
36
37
38
39
40
41
42
43
44
45
.my_post_copyright {
width: 85%;
max-width: 45em;
margin: 2.8em auto 0;
padding: 0.5em 1.0em;
border: 1px solid #d3d3d3;
font-size: 0.93rem;
line-height: 1.6em;
word-break: break-all;
background: rgba(255,255,255,0.4);
}
.my_post_copyright p{margin:0;}
.my_post_copyright span {
display: inline-block;
width: 5.2em;
color: #333333; // title color
font-weight: bold;
}
.my_post_copyright .raw {
margin-left: 1em;
width: 5em;
}
.my_post_copyright a {
color: #808080;
border-bottom:0;
}
.my_post_copyright a:hover {
color: #0593d3; // link color
text-decoration: underline;
}
.my_post_copyright:hover .fa-clipboard {
color: #000;
}
.my_post_copyright .post-url:hover {
font-weight: normal;
}
.my_post_copyright .copy-path {
margin-left: 1em;
width: 1em;
+mobile(){display:none;}
}
.my_post_copyright .copy-path:hover {
color: #808080;
cursor: pointer;
}
3.在 root/themes/next/layout/_macro/post.njk 添加如下代码:
1
2
3
4
5
6
7
8
9
{#####################}
{### END POST BODY ###}
{#####################}

{% if not is_index %}
<div>
{% include 'my-copyright.njk' %}
</div>
{% endif %}
4.打开 root/themes/next/source/css/_common/components/post/index.styl 文件,在最后一行增加代码:
1
@import "my-post-copyright"
5.设置新建文章自动开启 copyright ,即新建文章自动显示自定义的版权声明,打开 root/scaffolds/post.md 文件,设置如下:
1
2
3
4
5
---
title: {{ title }}
date: {{ date }}
copyright: true
---

  • 注:之前发布的文章需在文章配置内添加属性 copyright: true。

代码样式自定义

在 root/source/_data/styles.styl 添加以下内容:

1
2
3
4
5
6
// Custom styles.
code {
color: #B22222; //代码颜色
background: #fbf7f8; //代码背景颜色
margin: 5px;
}

代码块样式更改

主题配置文件里找到 codeblock 进行修改,代码块主题可到 NexT Highlight Theme Preview 预览。

1
2
3
4
5
6
7
8
9
10
11
12
13
14
codeblock:
# Code Highlight theme
# All available themes: https://theme-next.js.org/highlight/
theme:
light: default
dark: stackoverflow-dark
prism:
light: prism
dark: prism-dark
# Add copy button on codeblock
copy_button:
enable: true
# Available values: default | flat | mac
style: mac

文章目录默认展开

如果文章内容是多级目录,默认二级目录是合并的。可更改主题配置文件中 toc 的 expand_all 为 true 来让文章目录默认展开。

1
2
3
4
5
6
7
8
9
10
toc:
enable: true
# Automatically add list number to toc.
number: true
# If true, all words will placed on next lines if header width longer then sidebar width.
wrap: false
# If true, all level of TOC in a post will be displayed, rather than the activated part of it.
expand_all: true
# Maximum heading depth of generated toc.
max_depth: 6

更改背板透明度[^touming]

在 root/source/_data/styles.styl 里添加如下内容:

1
2
3
4
//文章背板透明度
.post-block{
opacity: 0.9;
}

修改标题下文章描述文字的颜色

在 root/source/_data/styles.styl 里添加如下内容:

1
2
3
.posts-expand .post-meta-container {	//标题下的文字颜色
color: #346c9c;
}

设置文章永久链接

这里介绍两种方法:

  • 配置自定义 permalink 的属性
  • 使用 hexo-abbrlink 插件生成链接

1.在站点配置文件找到 permalink,设置如下:

1
permalink: posts/:year:month:day:id.html
2.在 md 文件里给文章添加一个 id 属性以区分同一天发表的文章:
1
2
3
4
5
6
---
title:
date:
id: a1
tags:
---

1.插件下载:
npm install hexo-abbrlink --save
2.在站点配置文件找到 permalink,设置如下:

1
2
3
4
5
permalink: posts/abbrlink.html

abbrlink:
alg: crc32 #算法 crc16(defualt) and crc32
rep: hex #进制 dec(default) and hex

更改文章底部标签图标

修改主题配置文件的 tag_icon:

1
tag_icon: fa-tag

使用 mermaid 绘图

1.安装插件:
npm install hexo-filter-mermaid-diagrams --save
2.修改主题配置文件

1
2
3
# Mermaid tag
mermaid:
enable: true

其他自定义样式

先在 themes/next/source/css/_custom/custom.styl 中添加以下样式:

1
2
3
4
5
6
7
8
9
10
11
12
13
14
15
16
17
18
19
20
21
22
23
24
25
26
27
28
29
30
31
32
33
34
35
36
37
38
39
40
41
42
43
44
45
46
47
48
49
50
51
52
53
54
55
56
57
58
59
60
61
62
63
64
65
66
67
68
69
70
71
72
73
74
75
76
77
78
79
80
81
82
83
84
85
86
87
88
89
90
91
92
93
94
95
96
97
98
99
100
101
102
103
104
105
106
107
108
109
110
111
112
113
114
115
116
117
118
119
120
121
122
123
124
125
126
127
128
129
130
131
132
133
134
135
136
137
138
139
140
141
142
143
144
145
146
147
148
149
150
151
152
153
154
155
156
157
158
159
160
161
162
163
164
165
166
167
168
169
170
171
// 下载样式
a#download {
display: inline-block;
padding: 0 10px;
color: #000;
background: transparent;
border: 2px solid #000;
border-radius: 2px;
transition: all .5s ease;
font-weight: bold;
&:hover {
background: #000;
color: #fff;
}
}
//颜色块-黄
span#inline-yellow {
display:inline;
padding:.2em .6em .3em;
font-size:80%;
font-weight:bold;
line-height:1;
color:#fff;
text-align:center;
white-space:nowrap;
vertical-align:baseline;
border-radius:0;
background-color: #f0ad4e;
}
// 颜色块-绿
span#inline-green {
display:inline;
padding:.2em .6em .3em;
font-size:80%;
font-weight:bold;
line-height:1;
color:#fff;
text-align:center;
white-space:nowrap;
vertical-align:baseline;
border-radius:0;
background-color: #5cb85c;
}
// 颜色块-蓝
span#inline-blue {
display:inline;
padding:.2em .6em .3em;
font-size:80%;
font-weight:bold;
line-height:1;
color:#fff;
text-align:center;
white-space:nowrap;
vertical-align:baseline;
border-radius:0;
background-color: #2780e3;
}
// 颜色块-紫
span#inline-purple {
display:inline;
padding:.2em .6em .3em;
font-size:80%;
font-weight:bold;
line-height:1;
color:#fff;
text-align:center;
white-space:nowrap;
vertical-align:baseline;
border-radius:0;
background-color: #9954bb;
}
// 右侧边框红色块级
p#div-border-right-red {
display: block;
padding: 10px;
margin: 10px 0;
border: 1px solid #ccc;
border-right-width: 5px;
border-radius: 3px;
border-right-color: #df3e3e;
}
// 右侧边框黄色块级
p#div-border-right-yellow {
display: block;
padding: 10px;
margin: 10px 0;
border: 1px solid #ccc;
border-right-width: 5px;
border-radius: 3px;
border-right-color: #f0ad4e;
}
// 右侧边框绿色块级
p#div-border-right-green {
display: block;
padding: 10px;
margin: 10px 0;
border: 1px solid #ccc;
border-right-width: 5px;
border-radius: 3px;
border-right-color: #5cb85c;
}
// 右侧边框蓝色块级
p#div-border-right-blue {
display: block;
padding: 10px;
margin: 10px 0;
border: 1px solid #ccc;
border-right-width: 5px;
border-radius: 3px;
border-right-color: #2780e3;
}
// 右侧边框紫色块级
p#div-border-right-purple {
display: block;
padding: 10px;
margin: 10px 0;
border: 1px solid #ccc;
border-right-width: 5px;
border-radius: 3px;
border-right-color: #9954bb;
}
// 上侧边框红色
p#div-border-top-red {
display: block;
padding: 10px;
margin: 10px 0;
border: 1px solid #ccc;
border-top-width: 5px;
border-radius: 3px;
border-top-color: #df3e3e;
}
// 上侧边框黄色
p#div-border-top-yellow {
display: block;
padding: 10px;
margin: 10px 0;
border: 1px solid #ccc;
border-top-width: 5px;
border-radius: 3px;
border-top-color: #f0ad4e;
}
// 上侧边框绿色
p#div-border-top-green {
display: block;
padding: 10px;
margin: 10px 0;
border: 1px solid #ccc;
border-top-width: 5px;
border-radius: 3px;
border-top-color: #5cb85c;
}
// 上侧边框蓝色
p#div-border-top-blue {
display: block;
padding: 10px;
margin: 10px 0;
border: 1px solid #ccc;
border-top-width: 5px;
border-radius: 3px;
border-top-color: #2780e3;
}
// 上侧边框紫色
p#div-border-top-purple {
display: block;
padding: 10px;
margin: 10px 0;
border: 1px solid #ccc;
border-top-width: 5px;
border-radius: 3px;
border-top-color: #9954bb;
}

文字背景色块

1
2
<span id="inline-blue">站点配置文件</span>
<span id="inline-purple">主题配置文件</span>

站点配置文件主题配置文件

引用边框变色

1
2
<p id="div-border-right-red">div-border-right-red </p>
<p id="div-border-top-blue">div-border-top-blue</p>

div-border-right-red

div-border-top-blue

图形边框效果

1
2
<a id="download" href="https://git-scm.com/download/win"><i class="fa fa-download"></i><span> Download Now</span>
</a>

Download Now

使用 Hexo & Next 支持的标签

详见 Hexo & Next 标签使用说明

SEO(搜索引擎优化)

搜索引擎提交入口:
- Google提交入口
- 百度提交入口

Google 验证网站

1.打开 Google Search Console,添加网域资源。
2.通过 TXT 记录验证。 3.按照提示添加解析记录
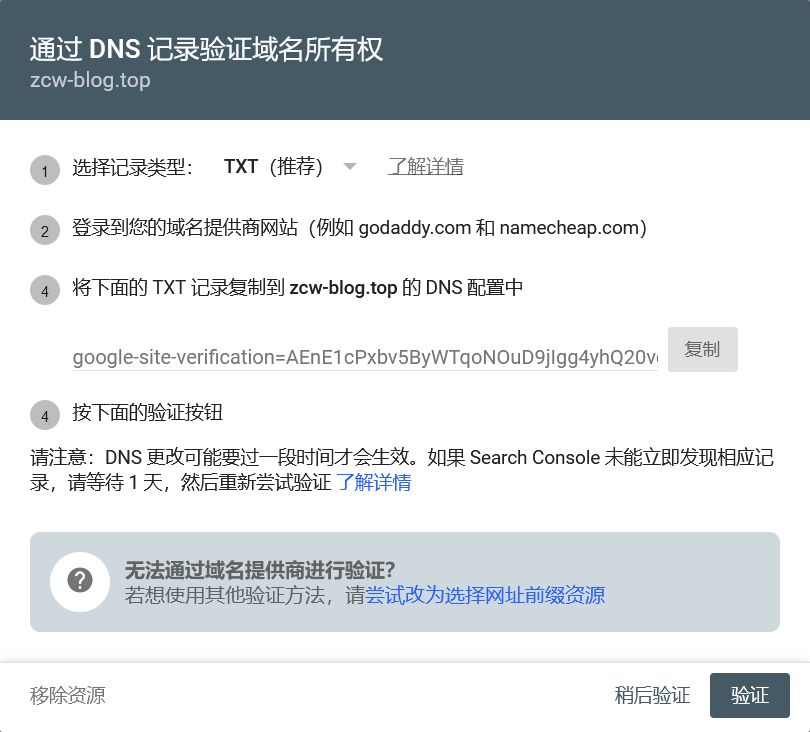
4.完成验证。

百度验证网站

1.登录百度站长添加网站域名。
2.选择 CNAME 验证。
3.按照提示把地址解析到 ziyuan.baidu.com。
4.完成验证。

添加并提交sitemap

1.安装 hexo 的 sitemap 网站地图生成插件:

1
2
npm install hexo-generator-sitemap --save
npm install hexo-generator-baidu-sitemap --save
2.在站点配置文件中添加如下代码:
1
2
3
4
5
6
# hexo sitemap
sitemap:
path: sitemap.xml

baidusitemap:
path: baidusitemap.xml
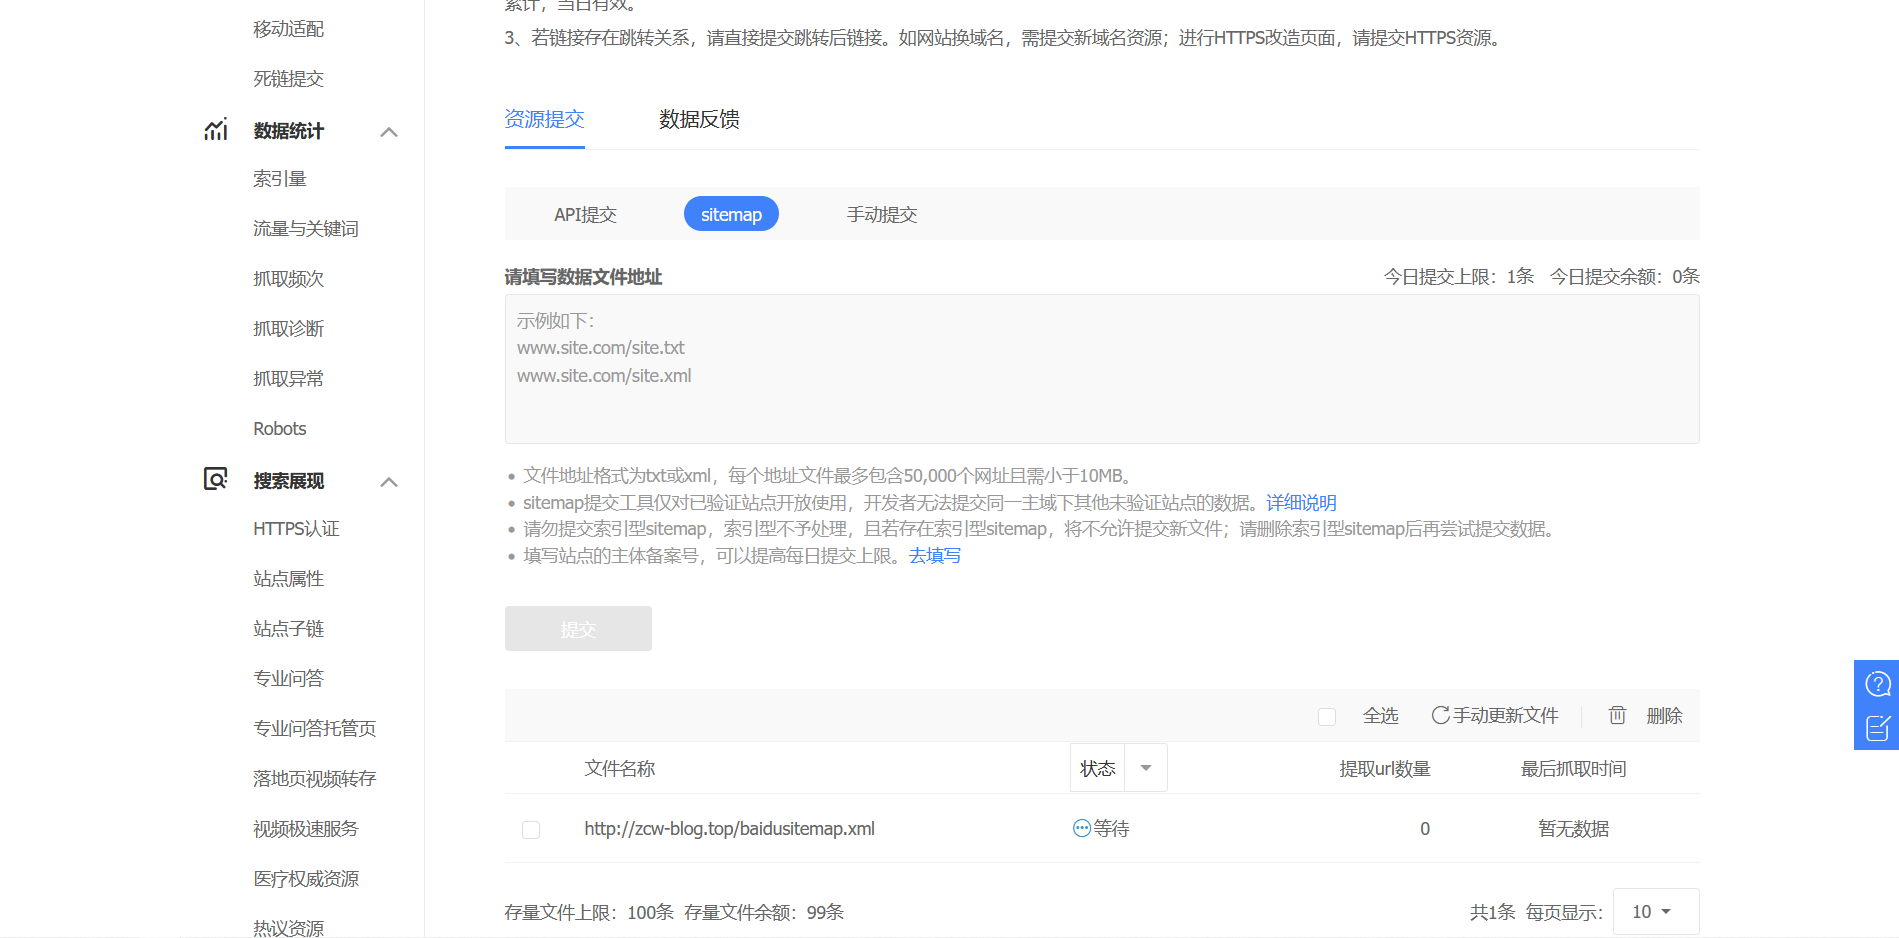
配置成功后,会生成 sitemap.xml 和 baidusitemap.xml,前者适合提交给谷歌搜素引擎, 后者适合提交百度搜索引擎。
3.提交百度 sitemap,如下: 4.提交 Google sitemap

添加蜘蛛协议

1.在 /source 目录下新建一个 robots.txt 文件,添加代码:

1
2
3
4
5
6
7
8
9
10
11
12
13
14
15
16
17
18
19
20
#hexo robots.txt
User-agent: *

Allow: /
Allow: /archives/
Allow: /about/
Allow: /categories/
Allow: /bookmarks/
Allow: /gallery/

Disallow: /vendors/
Disallow: /js/
Disallow: /css/
Disallow: /fonts/
Disallow: /vendors/
Disallow: /fancybox/

Sitemap: http://zcw-blog.top/search.xml
Sitemap: http://zcw-blog.top/sitemap.xml
Sitemap: http://zcw-blog.top/baidusitemap.xml
Allow 字段的值即为允许搜索引擎爬取的内容,可以对应到主题配置文件中的 menu 目录配置,如果菜单栏还有其他选项都可以按照格式自行添加。同时还需将 Sitemap 的值改成自己的域名。
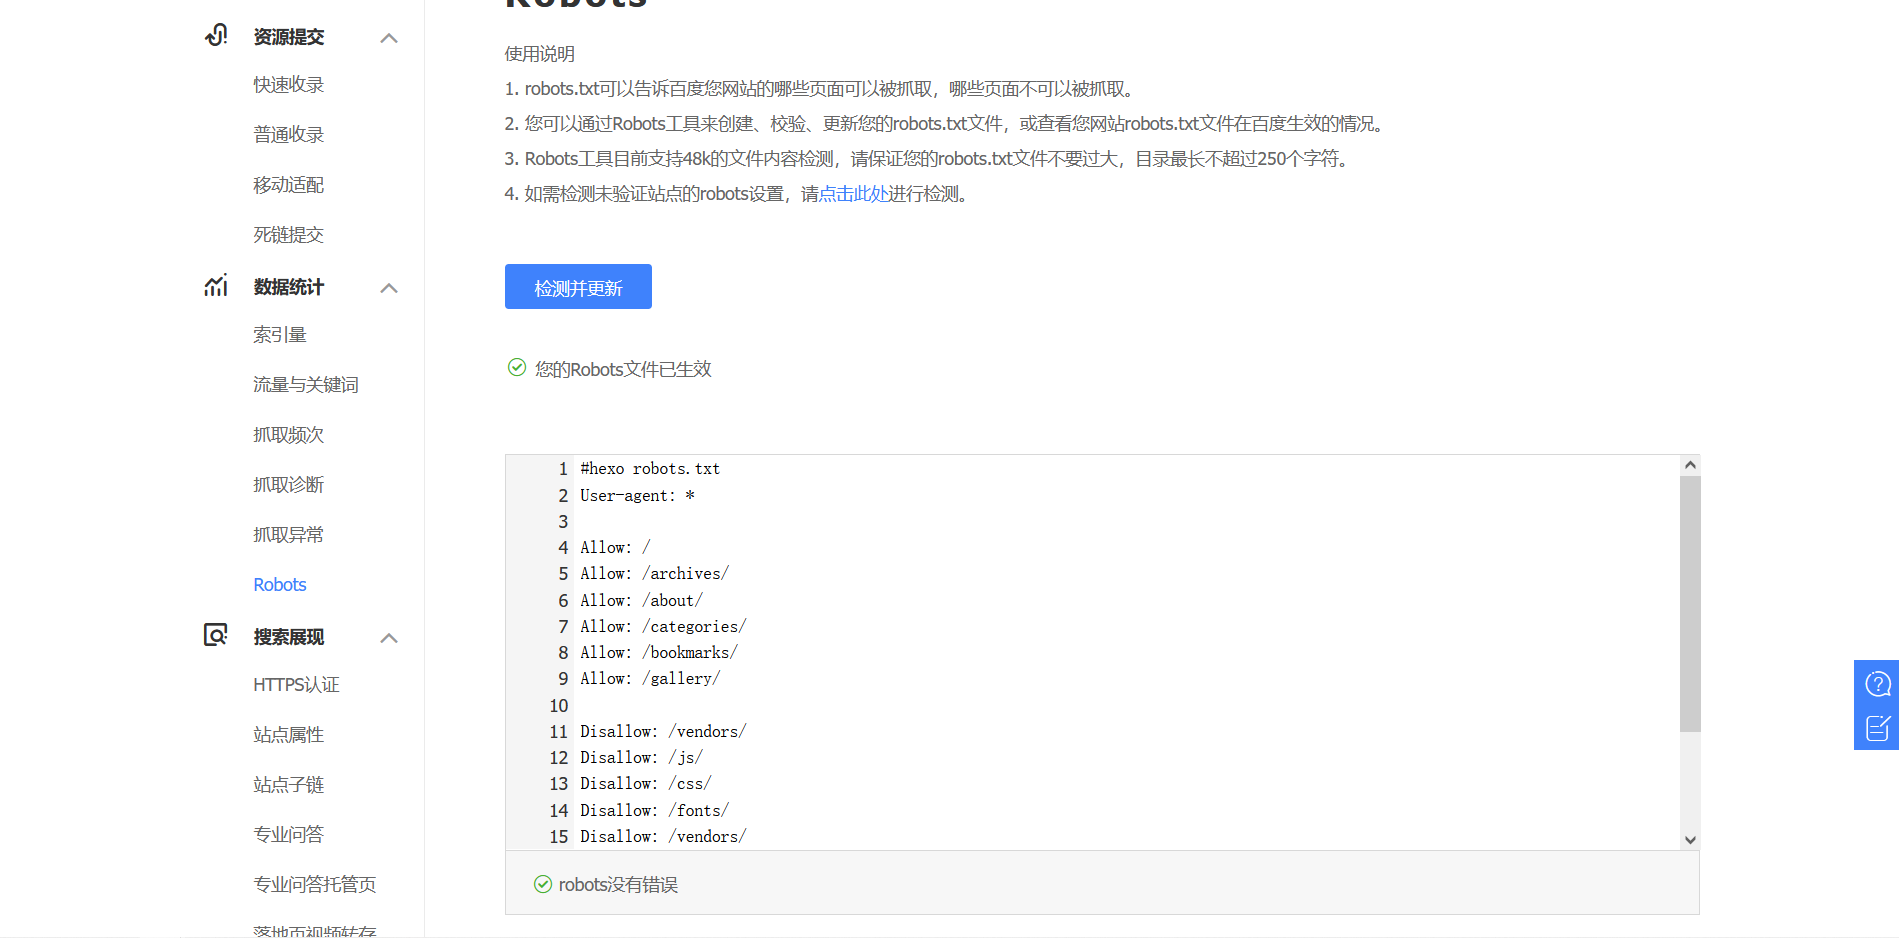
2.然后到百度站长更新一下:
3.在 Google 更新一下

主动推送

1.安装主动推送插件:

1
npm install hexo-baidu-url-submit --save
2.在站点配置文件中添加如下代码:
1
2
3
4
5
baidu_url_submit:
count: 3 ## 比如3, 代表提交最新的三个链接
host: www.henvyluk.com ## 在百度站长平台中注册的域名
token: your_token ## 请注意这是您的秘钥, 请不要发布在公众仓库里!
path: baidu_urls.txt ## 文本文档的地址, 新链接会保存在此文本文档里
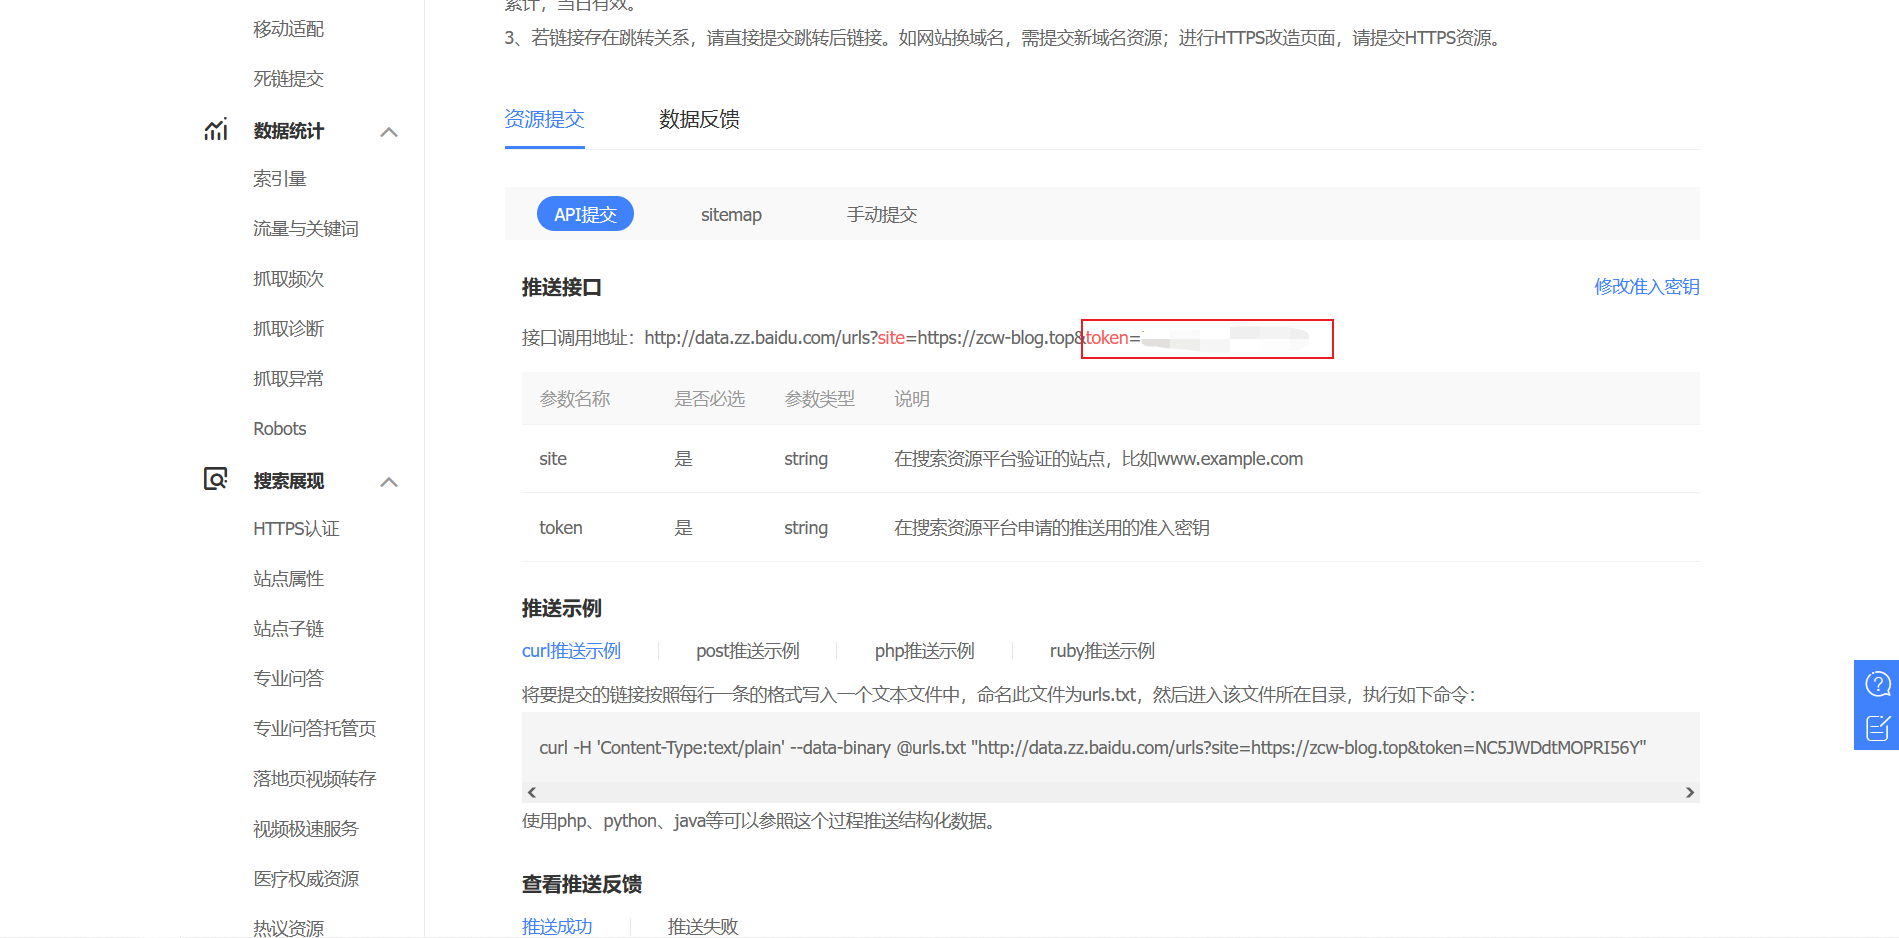
3.your_token 可在百度站长如下位置找到 4.记得查看站点配置文件中 url 的值,必须是百度站长平台注册的域名,如:
1
2
3
# URL
## Set your site url here. For example, if you use GitHub Page, set url as 'https://username.github.io/project'
url: https://zcw-blog.top
5.接下来添加一个新的 deploy 的类型 baidu_url_submitter:
1
2
3
4
5
6
7
8
9
10
11
# Deployment
## Docs: https://hexo.io/docs/one-command-deployment
deploy:
- type: git
repository:
github: git@github.com:reman2021/reman2021.github.io.git,main #github的仓库地址
coding: git@e.coding.net:reman/reman/reman.git,master #coding的仓库地址
# branch:
#github: main
# coding: master
- type: baidu_url_submitter
执行hexo deploy的时候, 新的连接就会被推送了。

原理:
- 新链接的产生:hexo generate会产生一个文本文件,里面包含最新的链接
- 新链接的提交:hexo deploy会从上述文件中读取链接,提交至百度搜索引擎

自动推送

把主题配置文件中的 baidu_push 设置为 true 即可。

自动给所有外部链接添加 nofollow

1.安装 hexo-autonofollow:

1
npm install hexo-autonofollow --save
2.新增以下内容到站点配置文件:
1
2
3
4
5
# 外部链接优化
nofollow:
enable: true
exclude: # 例外的链接,可将友情链接放置此处
- 'yousite'

网络爬虫会在当前页面搜索所有的链接,然后一个个查看,所以就很有可能跳到别的网站就不回来了。这个时候就需要 nofollow 起作用了。 nofollow 标签是由谷歌领头创新的一个反垃圾链接的标签,并被百度、yahoo 等各大搜索引擎广泛支持,引用 nofollow 标签的目的是:用于指示搜索引擎不要追踪(即抓取)网页上的带有 nofollow 属性的任何出站链接,以减少垃圾链接的分散网站权重。

参考文章

NexT使用文档
Hexo博客Next主题添加粒子时钟特效
Next7.8主题更换思源宋体
Hexo设置永久链接
Hexo-NexT 支持简体繁体一键切换
基于Hexo搭建个人博客——进阶篇(从入门到入土)
https://www.liaofuzhan.com/posts/2114475547.html
2019Hexo博客Next主题深度美化 打造一个炫酷博客(2)


  1. 发光体的颜色模式为“加色模式”,即“RGB模式”,而在网页上要指定一种颜色,就要使用“RGB模式”来确定,方法是分别指定 R/G/B,也就是红/绿/蓝三种基色的强度,通常规定,每一种颜色强度最低为 0,最高为 255,并通常都以 16 进制数值表示,那么 255 对应于十六进制就是 FF,并把三个数值依次并列起来,以 # 开头就是颜色的十六进制代码。↩︎

  2. RSS 需要有一个 Feed 链接,而这个链接需要靠 hexo-generator-feed 插件来生成。↩︎

  3. 简体繁体切换的原理:首先建立一个简体字与繁体字相对应的映射表,然后遍历整个界面,把相应的简体字或者是繁体字映射为对应的字体。↩︎

  4. 代码块要放置在 sider-inner 的 div 块中,放在 div 块的位置决定了时钟样式的展示位置。↩︎

-------------------------- --------------------------

本文标题:Hexo + NexT 配置优化指南

文章作者:reman

发布时间:2022年04月24日 - 16:17:13

最后更新:2022年08月20日 - 14:39:04

原始链接:https://zcw-blog.top/posts/20220424a1/

许可协议: 署名-非商业性使用-禁止演绎 4.0 国际 转载请注明出处。